Wednesday, 14 August 2013

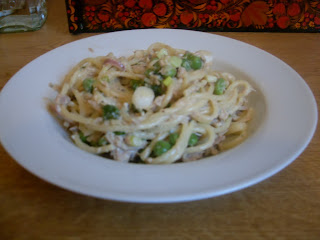
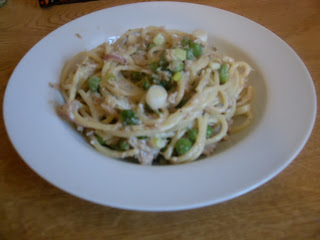
Tuna, Pea, Onion and Cheese Spaghetti

Here is a simple yet tasty supper or lunch. This was another of my 'store cupboard suppers' as I created it with what I had left in the fridge. It turned out very tasty!

Ingredients (serves 2 with a little extra for the fridge):
Tin of tuna, drained
4 cloves of garlic, finely chopped
4-5 spring onions, sliced
1 small red onion, finely sliced
About 50g soft cheese (or whatever's left in the bottom of the tub!)
Green Chilli, finely chopped (optional)
Grated Italian hard cheese (Parmesan, Grana Padano, Pecorino etc.)
Handful frozen peas
salt, pepper 
Dash of olive oil
Spaghetti (or Linguine) boiled until al dente
Dash of white wine
Handful flat leaf parsley, finely chopped


Method:
  1. Cook the pasta and heat the oil in either a frying pan or wok.
  2. Add the red onion to the oil and fry on medium for a few minutes. Now add the garlic, chilli (if using) and peas. Fry for another couple of minutes before adding the cheese to the pan and a dash of white wine.
  3. Turn up the heat a little and when the cheese has melted a bit add the tuna, spring onions, parsley, a sprinkle of hard cheese and season with salt and pepper.
  4. Once heated through toss in the spaghetti with a little pasta water. Serve and garnish with hard cheese, parsley and a grinding of fresh black pepper. Bon Appetit!


Cava and Valencian Orange Leopard Cakes

This is another of my sallies into cake baking. I shan't write the recipe out as it is just the same as the Honey and Sicilian Lemon Cupcakes (see back catalogue) with a few changes. I used Valencian Orange flavouring instead of lemon and I used Cava to bind the cakes instead of milk/honey. These cakes actually went better than the lemon ones, the consistency was softer. I made a marble effect in the cake by colouring a small amount of the cake mix orange with a mix of yellow and red food colouring and swirling it into each individual cake. My icing actually went better this time, I think I used too much butter last time. I also bound the icing with cava and flavoured it with Valencian Orange flavouring.

Before going in the oven I swirled in some orange cake mix.

The marbled effect before icing.

Cakes now iced, time to decorate!

I chose to decorate with edible silver balls and mini candied orange jelly slices.

Delicious!


Plaice Goujons served with a Salsa Verde in a Potato Basket

I've had a break from cooking recently as I've been working and I went to Berlin. So for my first recipe in a while I decided to try something interesting. I came up with this recipe myself and this is the first time I've attempted potato baskets. I'd probably try and make them a little bigger next time and grease the tins with oil rather than butter as a lot of them stuck - but thankfully 2 out of 8 turned out okay! This was delicious and an easy one to spice up by just adding spices and/or chopped chillies to the potato basket mix and Plaice batter!

Ingredients (serves 2):

2 Plaice fillets (filleted and sliced into goujons)
1 Egg (beaten)
Breadcrumbs
Plain Flour
2 Large Potatoes
Olive Oil
Salt
Pepper
Pinch of Paprika, Cayenne and Turmeric
Sunflower Oil (for deep frying)
1 Lemon (cut into wedges)

For the Salsa Verde: Handful of capers, generous handful of parsley, very generous handful of basil, pinch of Mint, pinch of Rosemary, Salt, Pepper, dash Extra Virgin Olive Oil, dash White Wine Vinegar, one green chilli (deseeded).

Method:
  1. Make the Salsa Verde first to give the flavours time to intensify. Basically, just blend all the ingredients for it together, adding more oil to get the desired consistency. It should be like a dip. Put in the fridge.
  2. Now for the potato baskets. Peel and grate the potatoes raw then put the grated potato in a muslin cloth and squeeze out as much liquid as possible. Pre-heat the oven to about 180 degrees, then well combine the grated potato in a bowl with salt, pepper, spices and Olive Oil. Grease a muffin tin or ramekins and shape baskets into it. Make sure there are no gaps so the salsa can't leak out later on. Bake in the oven for about 30-40 minutes or until golden brown.
  3. For the goujons pre-heat the sunflower oil in a deep frying pan (be very careful as hot oil can be very dangerous). While the oil is heating coat each goujon first in flour (sprinkled with salt, pepper and spices), then in the beaten egg and finally in the breadcrumbs. 
  4. Check the oil is hot by dropping in a breadcrumb and seeing if it sizzles. Lay the goujons in individually, laying them away from your person. These will only take a minute or two each to cook depending on their size. When the breadcrumbs turn a dark golden brown they should be done. Lay the goujons on a piece of kitchen roll to drain away excess oil.
  5. To serve, place the goujons in a nice stack, place a warm potato basket to the side and fill with Salsa Verde and place lemon wedge on top.  Serve alone as a starter portion or with a side salad/green beans as I did to make a full meal. A green delight on a plate!


Saturday, 10 August 2013

Onion, Rosemary and Garlic BBQ Burgers

A while ago I got an old-fashioned hand mincer and have been wanting to use it:


Now it's the sunny season I finally can! Here is a simple and delicious BBQ burger recipe. Obviously it is fine to use bought mine but I used a combination of frying steak and rump. Unfortunately I was having such a nice time I forgot to take a photo of the burgers once cooked, but I still decided to include this recipe as they were delicious!


Ingredients (makes about 4 large burgers, or 8 small):
3 minced steaks or a large packet of mine
1 white onion, finely chopped
3-4 finely chopped garlic cloves
Very generous handful finely chopped Rosemary
Salt and freshly ground pepper
1 large egg, beaten

Method:
  1. Basically, combine everything! I liked using my hands for this making sure everything is well incorporated/mixed in.
  2. Shape into patties and lob on a sizzling hot BBQ. When cooked to your liking (I like mine well done), serve in a bun with whatever you like! We had options of cheese, tomato, salad, pineapple and a selection of spicy sauces. Yum!


Gooseberry and Strawberry Tart

Recently a colleague gave me a load of gooseberries from her garden and I was looking for something nice and summery to do with them for a dessert at a BBQ. I made some jam with the spare ones but I decided to make a tart, as I can't remember ever making one before. I chose to pair the gooseberries with strawberries to offset the bitterness. This was quite an easy recipe with a very tasty outcome!


Ingredients:

For the Pastry:
200g Plain Flour
1 heaped tbsp Icing Sugar
120g Butter (unsalted), cubed
1 egg yolk (save the white)
Milk
Pinch of salt

For the Filling:
200g Gooseberries
200g halved Strawberries
Zest and small squeeze of juice of 1 Lemon
3 tbsp ground Almonds
1 Egg white (saved from the pastry) lightly beaten

Method:

  1. For the pastry; rub together the flour, sugar, butter and salt with your fingertips until you get a breadcrumb-like consistency. Add the egg yolk and enough milk to bring the mixture together into a clumply dough. Knead lightly on a floured surface until it will shape into a ball. Wrap in clingfilm and chill in the fridge for half an hour.
  2. Combine the berries, sugar, lemon zest and juice and set aside to macerate for at least half an hour. (At this point I also added a little cheeky splash of Brandy!)
  3. Pre-heat the oven to 200 degrees and grease/line your chosen vessel. I chose a pie dish but you can create this whichever way you like.
  4. On a floured surface roll out just over half the pastry, quite thinly, and place in dish for the base. Leave a little too much as the edges will shrink a little when it bakes, you can cut any extra off later. Blind bake this for a few minutes in the oven. A good tip here, if you don't have baking balls like me, is to use rice or beans wrapped in tin foil to keep the base down. I used rice and the good thing is you can use the rice/beans again after use - just put them back in the packet!
  5. Cut the remaining pastry for your tart top. I decided to go for a latticed design but it's completely up to you.
  6. Spoon the fruit into the blind-baked pastry case with a small amount of the juices. Sprinkle over ground almonds and complete pastry topping to your liking. I did this by placing the strips of pastry over the top. Brush top with egg white and sprinkle over some granulated sugar.
  7. Bake for half an hour or until the pastry turns a deep golden colour. Serve warm with cream (or ice cream if you prefer!).